Openhab: Govee Light-strip, Motion Sensor, and Alexa

tl;dr: I explain how to integrate a Xiaomi Aquara Motion sensor and a Govee light-strip with my openhab-setup and present two nice applications: a night-light and an artificial pre-alarm-wakeup-sunrise.

For Christmas, I got an LED Light-strip (from Govee) that has a small microcontroller attached and lives in my WIFI. I also added it into my Alexa-Ecosystem (hence I can control it via Alexa-routines). However, I wanted to do more 🙂 The second present I got was a Xiaomi Aquara Motion-sensor (which speaks Zigbee and I should be able to control it with my Conbee II Zigbee-Stick). My plan was to combine the two things to build various gimmicks:

  • A night light that gets triggered by the motion sensor, when you get up in the night and that shines for ~20 seconds
  • when a new alarm gets set via Alexa, get the time via openhab (and HABapp) and 5 minutes before the alarm goes off, set the light-strip to “sunrise”, so that you are already woken up by the light (or at least the wake-up is more gentle).

Setup

Our Govee-Light-Strip is only added to Alexa and can be controlled from openhab via Alexa-Routines, so I added a new item “Echo_Bedroom_StartRoutine” I can send commands to. Also I can query the next alarm that has been set on the echo via the item “Echo_Bedroom_NextAlarm”.

Adding the motion-sensor is straightforward: we add it as a thing as a Zigbee-device to my “deconz”-devices (like the window open-close-sensor, cf. Window Alert Rule with HABApp and Alexa). Caveat: this one sensor, actually is two “things”, one presencesensor and one lightsensor (not very sensitive — I am not using it right now).

The relevant parts of my things and items files:

[smarhome.things]


Bridge amazonechocontrol:account:MyEchoAccount "Amazon Account" @ "Accounts" [discoverSmartHome=3, pollingIntervalSmartHomeAlexa=60, pollingIntervalSmartSkills=120]
{
  [...]
  Thing echo echo_dot_bedroom "Alexa" @ "Bedroom" [serialNumber="XXXX"]
}

Bridge deconz:deconz:homeserver [ host="x.x.x.x", httpPort="8090", apikey="XXXX" ] 
{
  [...]
  Thing lightsensor light_bedroom "Light sensor bedroom" @ "Bedroom" [ id="11", lastSeenPolling=2 ]
  Thing presencesensor motion_bedroom "Motion sensor bedroom" @ "Bedroom" [ id="12", lastSeenPolling=2 ]
}
[smarthome.items]


Switch presence_bedroom "Presence in the bedroom: [%s]." <motion> (gBedRoom) ["Motion"] {channel="deconz:presencesensor:homeserver:motion_bedroom:presence"}

Number:Illuminance lux_bedroom "Lux in the bedroom: [%d]" <light> ["Light"] {channel="deconz:lightsensor:homeserver:light_bedroom:lightlux"}

String Echo_Bedroom_StartRoutine "Start Routine"       (gAlexaEchosIn) {channel="amazonechocontrol:echo:MyEchoAccount:echo_dot_bedroom:startRoutine"}

Night Light

The basic night-light-functionality is simple: If the motion-sensor detects movement, we trigger an Alexa-routine (wich we called “bewegungssensor routine bett”) that switches our Govee-Light-Strip to “red” with an intensity of 1% for 20 seconds — this is low enough to not disturb a sleeping person, but high enough to illuminate the room dimly when getting up at night.

import HABApp
import HABApp.openhab.definitions

from HABApp.core.events import ValueUpdateEvent
from HABApp.core.events import ValueUpdateEventFilter
from HABApp.openhab.items import SwitchItem
from HABApp.openhab.items import StringItem

import datetime
import logging

log = logging.getLogger("MyRuleLogger")

class BedroomMovementDetector(HABApp.Rule):

    def __init__(self):
        super().__init__()
        self.movement_detector = SwitchItem.get_item("presence_bedroom")
        self.alexa_routine = StringItem.get_item("Echo_Bedroom_StartRoutine")
        self.movement_detector.listen_event(self.movement_detected, ValueUpdateEventFilter())

    def movement_detected(self, event: ValueUpdateEvent):
        log.debug(f'{event.name} updated value: "{event.value}"')
        log.debug(f"Last update of {self.movement_detector.name}: " +
                f"{self.movement_detector.last_update}")
        log.debug(f"Last change of {self.movement_detector.name}: " +
                f"{self.movement_detector.last_change}")

        if self.movement_detector.is_on():
            log.debug("Potentially, we switch on the night-light...")
            log.debug("Movement detected -- commanding alexa.")
            self.alexa_routine.oh_send_command("bewegungssensor routine bett")

BedroomMovementDetector()

Improvements

Our first version of the night-light above has two drawbacks:

  1. It also gets triggered during the day
  2. When we have started a routine that plays a scene on the light-strip and then trigger the motion-sensor, the scene will be interrupted

The first is not really a big issue — the light is barely visible, but still … . The second issue is more annoying. Many times close to bedtime, when we had set the light-strip to “sunset” (takes some 5-10 minutes) and then accidentally triggered the motion sensor, the light-strip went to “dark red” for 20 seconds and then went off. Any computer scientist will recognize this issue as a classic race condition and the easy solution is a semaphore/mutex — i.e. when we want to play a scene on the light-strip un-interrupted, we also set a virtual switch (“LED protection”) to “on”. And the night-light-rule checks if this LED-protection-switch is “off” before it fires.

We add a simple virtual switch to our “smarthome.items” file:

// Mutex for Ledi
Switch ledi_semaphore "Ledi Semaphore" <switch> {alexa="Switchable"}

(Yes, our light-strip is called “ledi” :)) So this virtual switch has to be added to Alexa and will be turned “on” by any Alexa-routine which should prevent the light-strip being triggered via the motion-sensor and the HABApp-rule below.

Since the rule is written in HABApp, we have the full power of python at our hands and we can simply compare timestamps:

    def movement_detected(self, event: ValueUpdateEvent):
        log.debug(f'{event.name} updated value: "{event.value}"')
        log.debug(f"Last update of {self.movement_detector.name}: " +
                f"{self.movement_detector.last_update}")
        log.debug(f"Last change of {self.movement_detector.name}: " +
                f"{self.movement_detector.last_change}")
        log.debug(f"Mutex state: '{self.mutex.get_value()}', movement state: \ 
                         '{self.movement_detector.get_value()}'")
        if self.mutex.is_off() and self.movement_detector.is_on():
            log.debug("Potentially, we switch on the night-light...")
            now = datetime.datetime.now().time() # ignore date -- only keep time
            # the rule should only be active in the night... between 21 and 7 o'clock
            morning_time = datetime.time(7,0,0,0)
            bed_time = datetime.time(21,0,0,0)
            if now > bed_time or now < morning_time:
                log.debug("Movement detected -- commanding alexa.")
                self.alexa_routine.oh_send_command("bewegungssensor routine bett")
            else:
                log.debug(f"Movement detected, but time now \
                                 ({now}) is outside 21--7 (nighttime) where rule should fire.")

Pre-Alarm Sunrise

Via the echo-control-binding we can get the next alarm (channel “nextAlarm”), so we just add a new item:

[smarthome.items]

DateTime Echo_Bedroom_NextAlarm  "Next alarm"  (gAlexaEchosIn) {channel="amazonechocontrol:echo:MyEchoAccount:echo_dot_bedroom:nextAlarm"}

The HABApp-rule is really simple: we get the time of the next alarm from Alexa via the Echo-control-binding, and a few minutes earlier, we start an Alexa-routine that switches the LED-strip into “sunrise” mode (not shown)

from HABApp.core.events import ValueUpdateEvent
from HABApp.core.events import ValueUpdateEventFilter

import logging

import datetime

log = logging.getLogger("MyRuleLogger")


class PreAlarmLight(HABApp.Rule):
    def __init__(self):
        super().__init__()
        self.next_alarm = DatetimeItem.get_item("Echo_Bedroom_NextAlarm")
        self.next_alarm.listen_event(self.alarm_set, ValueUpdateEventFilter())
        self.alexa_routine = StringItem.get_item("Echo_Bedroom_StartRoutine")

    def alarm_set(self, event: ValueUpdateEvent):
        log.debug(f"{event.name} updated value: '{event.value}'")
        time_of_alarm = self.next_alarm.get_value()
        time_of_LED = time_of_alarm - datetime.timedelta(minutes=5)
        self.run.at(time_of_LED, self.switch_pre_alarm_LED)

    def switch_pre_alarm_LED(self):
        log.debug(f"switching LED...")
        self.alexa_routine.oh_send_command("weckervorbeleuchtung")


PreAlarmLight()

Result

Sorry for the blurry picture — it is dark in the room:) .. and note that in reality the red-light at 1% is fairly dim — it does not disturb your sleep.

Hexagons!

TL;DR: More curves, this time on a hexagonal grid — Hendragon and Hendragon2.

So far, most of the curves we considered live on a square-grid.

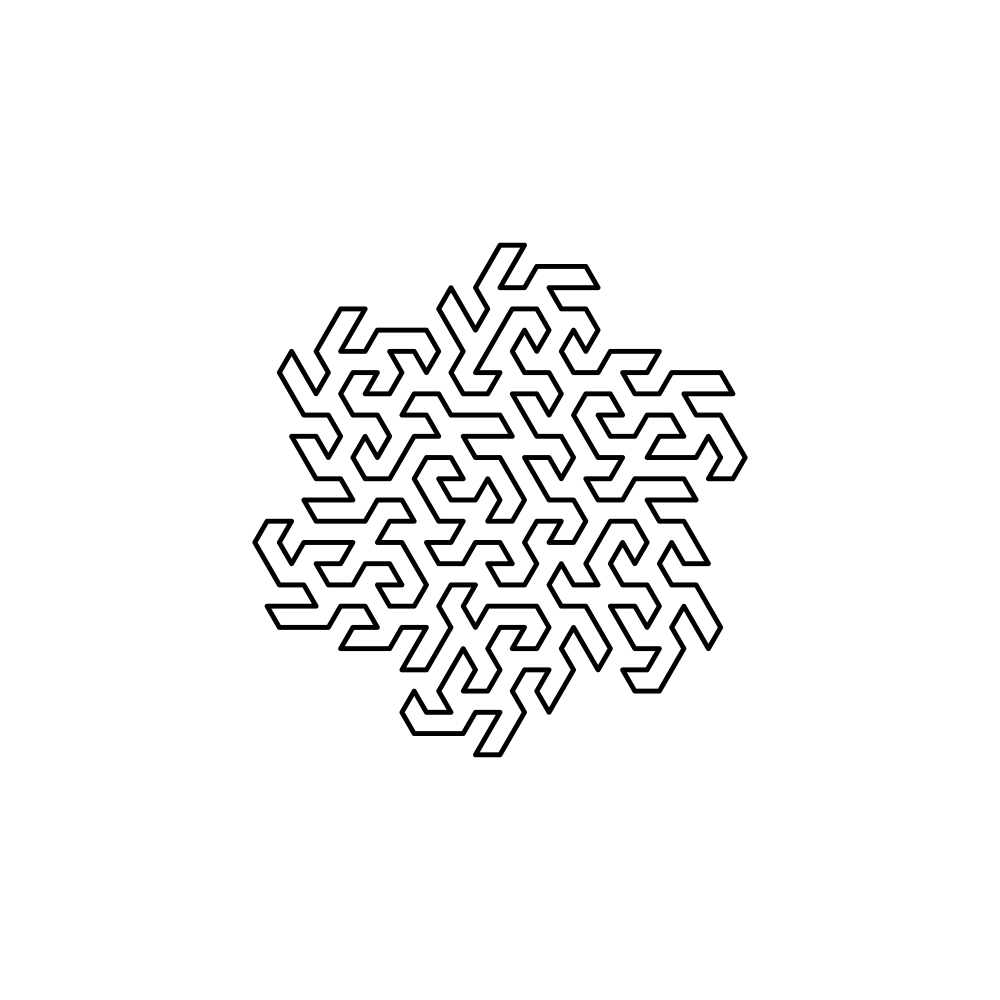
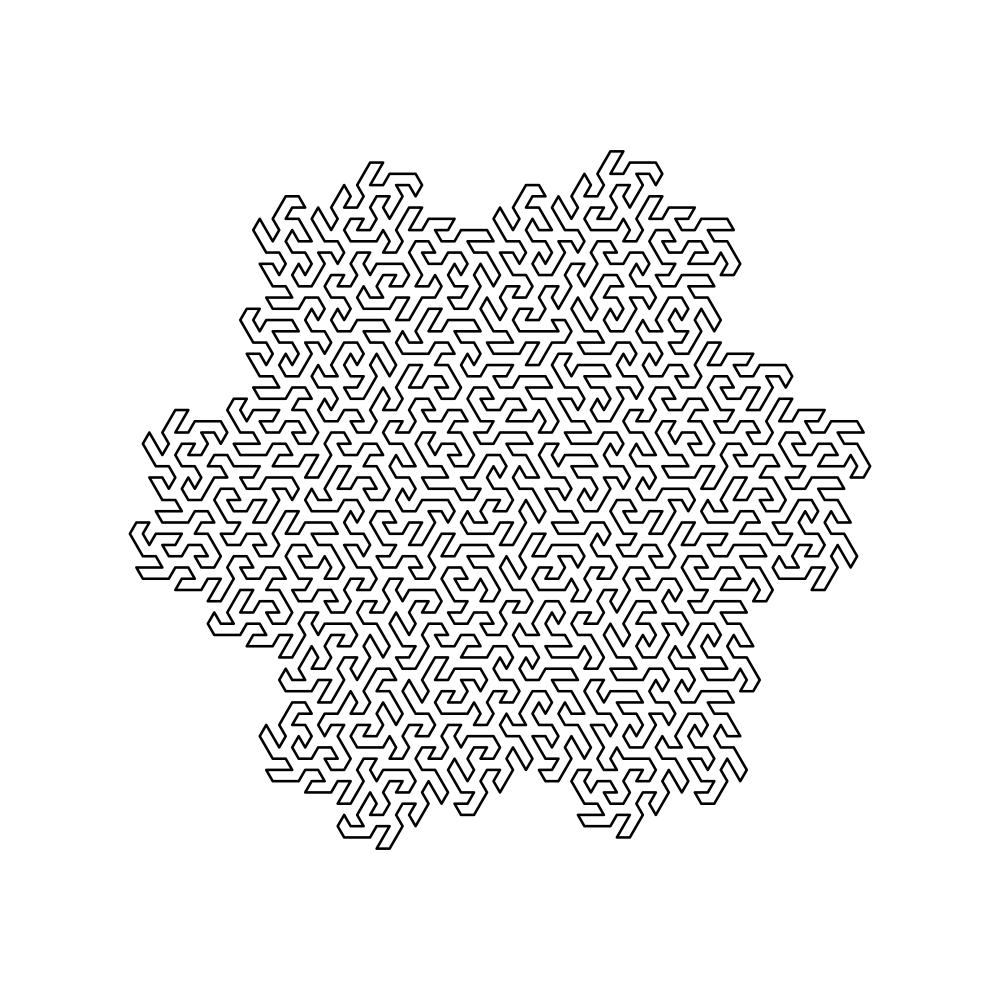
Since the hexagon is the bestagon we (read: mostly Hendrik) came up with a beautiful fractal curve, expressible as an L-system that has a hexagonal shape.

Hendragon1:

Iteration 1:

Iteration 2:

Iteration 3:

Iteration 4:

As beautiful as this curve is, it has one deficit: It is not space-filling (there are some regions in the plane, which will never get hit by the curve), e.g. the triangular region highlighted in red (pardon my crappy png-editing-skills ^^)

To calculate the dimension of the thing if the small hexagons were filled (which they are not — so the dimension of the whole curve should be smaller!), we note that we tile a hexagon with 7 smaller hexagons with 1/3 the length, so we get a dimension of D = \frac{\log(7)}{\log(3)}= 1.77\dots. At least something less than 2 — so nothing space-filling. We leave the calculation of the exact dimension of the curve for future work 🙂

L-System

The curve can be generated via an L-system:

\begin{array}{lll}M&\to&lFrFRFMFLFlFr\\ l &\to&lFRFrFLFlFlFr\\ r& \to &rFLFlFRFrFrFl\\ L &\to& rFlFLFRFLFlFr\\ R&\to& lFrFRFLFRFrFl \end{array}

Hendragon2: Space-filling (?)

It is very pleasing when the start-and end-point of a curve coincide and hence there is no visible start and finish and our next version Hendragon2 does that.

The L-System to produce this curve is a context-sensitive system, i.e. the left-hand-sides are no longer single letters but strings.

For the start-symbol: “S” we have the rules (I’ll just leave this here for reference, I think I have to pick Hendrik‘s brain further for the design :))

\begin{array}{lll}S &\to& rrrrRLR\\ M &\to& MRrLllr\\r &\to& MrRMLlr\\ R &\to& MrrRlLr\\l &\to& rRLlllr\\Ll &\to& rRLlllMlRrLllr\\ Lr &\to& rRLlllMrLlRrrl\\ LR &\to& rRLlllMMLRrrrl \end{array}

Iteration 1:

Hendragon2, iteration 1.

Iteration 2:

Hendragon2, iteration 2.

Iteration 3:

Hendragon2, iteration 3.

Iteration 4:

Hendragon2, iteration 4.

Open Questions + the Future

For the future we can study the curves in more detail (or some of my readers can?), in particular

  • Calculate the fractal dimension of the curves (and verify that the second one can tile the plane).
  • Relate the Hendragon2 to the Gosper-curve (and its cousins).

Drawing curves with L-systems

TL;DR: https://github.com/mschlund/lsystems

An L-system is a special kind of string rewriting system. It defines a set of rules to transform strings into other strings. For example, the system A \to AA started with the string consisting of the single symbol “A” will yield A \to AA \to AAAA \to A^8 \to \dots, where each iteration is denoted by one more “hop” \to.

For the nerds: Note, that such systems apply their rules in parallel in each iteration and thus, they are more expressive than context-free grammars since the different derivations happen at the same time and thus different “branches” of the derivation-tree are coupled (for instance, the non-context-free language \{a^nb^nc^n : n \in \mathbb{N}\} can easily be represented by an L-system).

Recursive Art

L-systems

A Sierpinski arrowhead curve at iteration 6

The above is a Sierpinski (arrowhead) curve at iteration 6, produced by

from lsystems import curves
sierp = curves.Sierpinski(width=5)
sierp.run(6, writeOutput=True)

We use a simple L-System with two variables (symbols which can be expanded further) A and B constants (characters that do not appear as left-hand-side of rules) +,-, starting from the single symbol A:

\begin{array}{lll} A &\to& B - A - B\\ B &\to& A + B + A \end{array}

So the first (two) iterations look like

A \to B - A - B \to A + B + A - B - A - B - A + B + A \to \dots

From Strings to Curves

The final step to produce graphics like the above is to interpret the symbols in a string like “B – A – B” (iteration 1) to yield

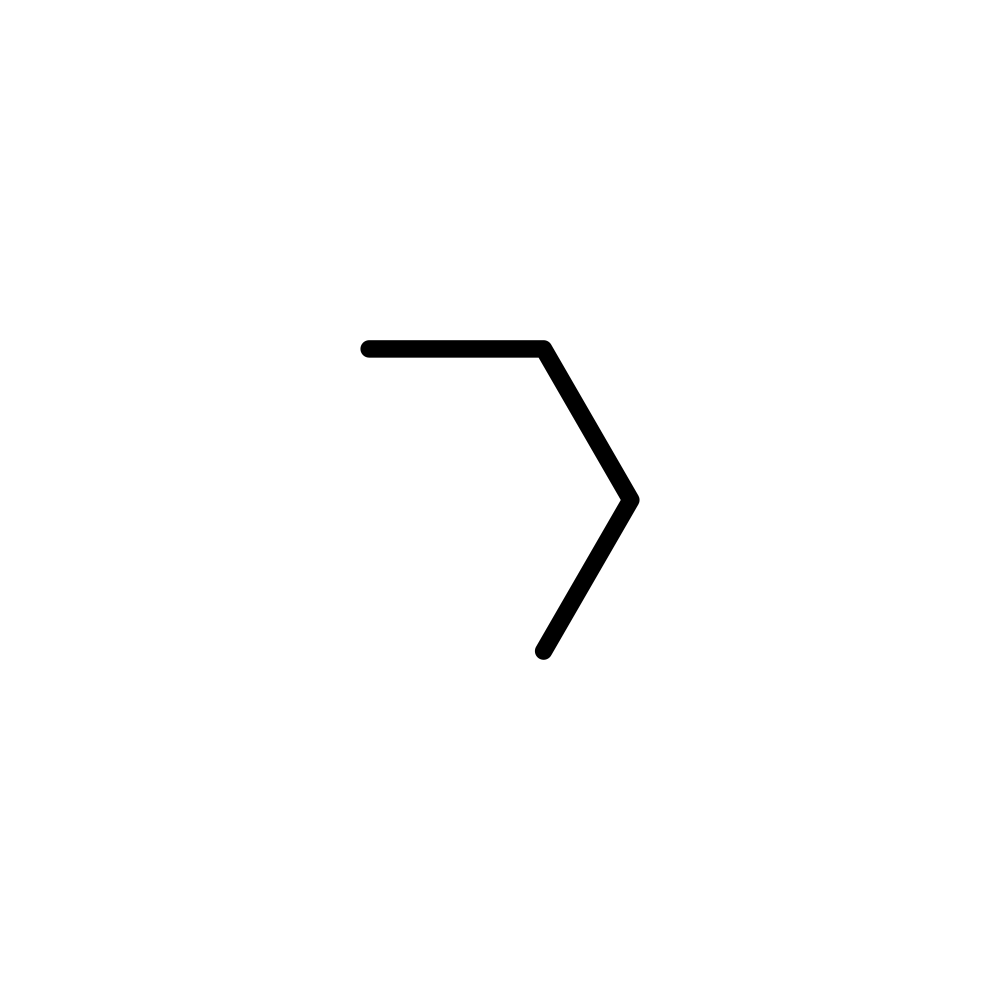
Sierpinski Curve, Iteration 1, 'B-A-B'

and “A + B + A – B – A – B – A + B + A” (iteration 2) to result in

Sierpinski Curve, Iteration 2, 'A+B+A-B-A-B-A+B+A'

To this end, we interpret the letters A and B in the final string to mean “draw a straight line segment”, and +,- as “turn 60° to the left/right”. We imagine these commands to be executed by a moving cursor, called a “turtle” (like in the “Logo” programming language).

Curved curves

So far, the curves generated via the L-Systems featured sharp bends. Especially for curves, like the dragon curve this looks a bit … improvable (especially for only few iterations). Inspired by the beautiful artwork that Donald Knuth has on the wall in his house we wanted to draw curves with smooth corners.

To this end we simply do a post-processing of the final string:

  1. We introduce new constants “)” and “(” meaning “left arc” and “right arc”
  2. we split each segment in half using the rule F \to XX
    (X is a fresh symbol representing “half of a straight line-segment”)
  3. We replace the patterns “X-X” by “(” and “X+X” by “)”
    (this is in fact a context-sensitve L-system)

Our first version used the svgturtle-package which is a wrapper around the standard python-turtle and produces polygon-segments instead of svg-arcs. This is almost invisible to the eye.

A friend of mine (https://github.com/HendrikRoehm) has contributed an awesome new feature to the repo: a simple turtle that produces clean svg-images and can produce curved-paths by writing svg-arcs.

Compare:

Old: https://raw.githubusercontent.com/mschlund/lsystems/ca0ff918b230f2a1f65634eb134c9c54635deb51/notebooks/sierpinski_curve.svg

New: https://raw.githubusercontent.com/mschlund/lsystems/main/notebooks/sierpinski_curve.svg

We hardly see a difference from far away, but the difference gets pretty obvious if we zoom in a bit:

Svg produced with the old method: Curves are approximated via line-segments. The curves look non-smooth.
Svg produced with the new method: Curves are drawn as svg-arcs. The curves look smooth.

The difference is even more pronounced if you look into the text-representation of the svg-images:

<?xml version="1.0" encoding="UTF-8"?>
<svg baseProfile="full" height="1500px" version="1.1" width="1500px" xmlns="http://www.w3.org/2000/svg" xmlns:ev="http://www.w3.org/2001/xml-events" xmlns:xlink="http://www.w3.org/1999/xlink"><defs><clipPath id="border_clip"><rect height="1500" width="1500" x="0" y="0"/></clipPath></defs><polyline clip-path="url(#border_clip)" fill="none" points="623.2485733904576,962.0113298208786 635.3076211353316,967.0063509461102 645.6629601946589,974.9522820760046 653.6088913245535,985.307621135332 661.5548224544481,995.6629601946595 671.9101615137754,1003.6088913245541 683.9692092586494,1008.6039124497856 696.9101615137754,1010.3076211353322 709.8511137689014,1008.6039124497856 [...]

versus

<?xml version="1.0" encoding="UTF-8"?>
<svg baseProfile="full" height="1000" version="1.1" viewBox="-100.0 -849.9999999999999 1166.0254037844381 950.0" width="1000" xmlns="http://www.w3.org/2000/svg" xmlns:ev="http://www.w3.org/2001/xml-events" xmlns:xlink="http://www.w3.org/1999/xlink"><defs/><path d="M 0 0 L 50.0000 0.0000 A 50.0000 50.0000 0 0 0 93.3013 -25.0000 A 50.0000 50.0000 -60 0 0 93.3013 -75.0000 A 50.0000 50.0000 -120 0 1 93.3013 -125.0000 A 50.0000 50.0000 -60 0 1 136.6025 -150.0000 [...]

After merging the latest PR, I also played with GithubActions a bit and added a simple workflow that also executes the tests.

Next: Hexagons

This post is already too long, so I will discuss our extensions in the next post: Hexagonal grids and the nice curves “Hendragon 1/2” 🙂

Code

https://github.com/mschlund/lsystems

The code is merely some few hundred lines of Python (we recommend >=3.11 which is much faster than 3.10) and the goal is to be more than a hack (hence, we also have tests, use GH-actions, etc.). Feel free to contribute!

As for package-manager-support we use poetry and provide a pyproject.toml-file (and also – deprecated (!) – env.yml and setup.py files for use with conda).

AOC’21 — day 01, “sonar-sweep”

I have put off this blog-entry waaaaay too long (also code-wise I am not really moving much faster — at day 03.. see the github https://github.com/mschlund/aoc21) but just putting the code on github without some words here feels like I am missing some opportunities.

In this exercise, we are given a list of numbers (a_i)_{i\in\mathbb{N}} and we should determine for each element (except the very first), whether its predecessor is smaller, larger, or equal, i.e. we effectively compute a new sequence b_i := \mathrm{sgn}(a_{i}-a_{i-1}), i>0 and then on b_i \in \{-1,0,1\} we should count the number of ones.

I am used to working with Scala2, but want to learn Scala3 and explore its new features. What I like so far:

  • the much cleaned-up syntax compared to Scala2– it is possible to omit many braces to define blocks in favor of indentation. python lead the way there and I like python — however, I love strongly, statically typed languages since the type-system helps you so much in getting your code right (most of the time: if it typechecks then it is likely to work).
  • a bit more functional “feel” (you are not forced anymore to nest your functions in some object or class)

Reading in the input

We simply split the input up into lines

private def getLines(signal : String) : Seq[String] =
  signal.split('\n')

def determineIncDec(signal : String): Seq[Direction] =
  val lines = getLines(signal)
  val nums = lines.map(_.toInt)
  numsToIncDec(nums) // TODO: still to be written at this point

Representing directions

In Scala3 it is much more convenient than in Scala2 to work with enumerations, so a direction is simply an enum that can take on three possible values:

enum Direction:
  case Inc, Dec, Eq

Test-driven-development

TDD is a development method where you first write a test (before even implementing anything), so if your test succeeds (goes “green”) your implementation later works (for this particular testcase). Then you make your solution prettier and you always use your testsuite to check whether your refactorings are safe (your workflow is red-green-refactor). If you do not know it, watch the great talk by Ian Cooper on TDD (and especially about how _not_ to do it…)

The aoc-problems are a perfect playground to do TDD imho:

  • the input-output-relation is well specified
  • a simple example is given in the problem description

I use the simple examples in the problem statements to define a testcase (and note that this is a pure behavioural approach — we want to test behaviours, not implementations!)

So for the very first example a bunch of numbers is given and the function determineIncDec should compute whether the sequence goes up or down (or does not change):

class SonarTests extends munit.FunSuite {
  val scans = """|199
                  |200
                  |208
                  |210
                  |200
                  |207
                  |240
                  |269
                  |260
                  |263""".stripMargin
  val dirs = determineIncDec(scans)

  test("(star1) Example 1 inc/dec") {
    val expectedDirs = Seq(
      Direction.Inc,
      Direction.Inc,
      Direction.Inc,
      Direction.Dec,
      Direction.Inc,
      Direction.Inc,
      Direction.Inc,
      Direction.Dec,
      Direction.Inc
    )
    assertEquals(dirs, expectedDirs)
  }

  test("(star1) Count incs") {
    val num_inc = dirs.count(_ == Direction.Inc)
    assertEquals(num_inc, 7)
  }

And of course, these tests should fail at first (since we did not implement any functionality yet) — To be able to meaningfully execute the testcases I make sure that all functions involved are at least type-correct (and so in this case the function determineIncDec returns an empty list):

def determineIncDec(signal: String): Seq[Direction] =
  Nil

Then we implement the “determineIncDec”-function to make our test pass

def determineIncDec(signal: String): Seq[Direction] =
  val lines = getLines(signal)
  val nums = lines.map(_.toInt)
  numsToIncDec(nums)

private def numsToIncDec(signalNum: Seq[Int]): Seq[Direction] =
  val nums = signalNum :+ 0
  val numsShifted = 0 +: signalNum

  val pairs = numsShifted.zip(nums)
  val dirs = pairs.map(compare).drop(1).dropRight(1)
  dirs

private def compare(a: Int, b: Int): Direction =
  if a < b then Direction.Inc
  else if a > b then Direction.Dec
  else Direction.Eq

Sliding-window

For the second star we have to consider a sliding window of size k on the signal in order to determine, whether it increases, decreases, or stays the same. Formally, we do not use the sequence a_i directly, but compute an aggregated version

\tilde{a}_i := \sum_{j=i-k}^{i}a_j, i>k

instead and use this to compute whether the signal goes up or down (or stays the same), i.e.

\tilde{b}_i := \mathrm{sgn}(\tilde{a}_{i}-\tilde{a}_{i-1}), i>k

Note, that all these sequences are undefined, if a_i has less than k elements.

Again we first provide a (failing) test and then implement the functionality

  val scans = """|199
                  |200
                  |208
                  |210
                  |200
                  |207
                  |240
                  |269
                  |260
                  |263""".stripMargin

  val dirWin3 = determineIncDecSliding(scans, 3)

  test("(star2) Example 1 inc/dec") {
    val expectedDirsWin3 = Seq(
      Direction.Inc,
      Direction.Eq,
      Direction.Dec,
      Direction.Inc,
      Direction.Inc,
      Direction.Inc,
      Direction.Inc
    )
    assertEquals(dirWin3, expectedDirsWin3)
  }

Here, the scala-function “sliding” (https://www.scala-lang.org/api/3.1.1/scala/collection/Seq.html#sliding-fffff156) operates on sequences just as we want.

def determineIncDecSliding(signal: String, windowSize: Int): Seq[Direction] =
  val lines = getLines(signal)
  val nums = lines.map(_.toInt)
  val aggSignal = sumAggregateWindow(nums, windowSize)
  numsToIncDec(aggSignal)

private def sumAggregateWindow(signalNum: Seq[Int], windowSize: Int): Seq[Int] =
  val aggregateSignal = signalNum.sliding(windowSize).map(_.sum)
  aggregateSignal.toSeq

Final words

Code can be found on GitHub https://github.com/mschlund/aoc21/tree/main/01-sonar-sweep.

Scala 3 and TDD are nice. TDD is actually speeding up your coding (you always have a suitable subject for debugging and I like the “gamification-aspect” … first you write a test — it is red and this triggers some hunting-instincts until it is green 🙂 )

Upgrading HABApp

Since the last upgrade of Openhab (3.2 -> 3.3), my HabAPP (0.31) (and hence my window rule) was not working anymore. The newest upgrade (first major release 1.0) of HabAPP fixes these issues. I wanted to give the newest version a try (since my current setup is broken anyways…).

First I had to upgrade my python-installation (which was at an ancient 3.7 …) to be able to install habapp via pip.

  1. I installed a brand-new python https://community.openhab.org/t/habapp-1-0-beta-test/136952/38
  2. I removed the old habapp-virtualenv in /opt/habapp and just installed it anew following
    https://habapp.readthedocs.io/en/latest/installation.html
  3. I had to change some config-parameters (in /etc/openhab/habapp/config.yml — the logs will tell you which config-value is not fitting the expected schema)
    e.g.:
2022-08-07 18:34:35.931 [ERROR] [HABApp.Config] - 6 validation errors for ApplicationConfig
2022-08-07 18:34:35.931 [ERROR] [HABApp.Config] - mqtt -> connection -> tls
2022-08-07 18:34:35.931 [ERROR] [HABApp.Config] -   value is not a valid dict (type=type_error.dict)
2022-08-07 18:34:35.932 [ERROR] [HABApp.Config] - mqtt -> connection -> tls_ca_cert
2022-08-07 18:34:35.932 [ERROR] [HABApp.Config] -   extra fields not permitted (type=value_error.extra)
2022-08-07 18:34:35.932 [ERROR] [HABApp.Config] - mqtt -> connection -> tls_insecure
2022-08-07 18:34:35.932 [ERROR] [HABApp.Config] -   extra fields not permitted (type=value_error.extra)
2022-08-07 18:34:35.932 [ERROR] [HABApp.Config] - mqtt -> subscribe -> topics
2022-08-07 18:34:35.933 [ERROR] [HABApp.Config] -   'int' object is not iterable (type=type_error)
2022-08-07 18:34:35.933 [ERROR] [HABApp.Config] - openhab -> connection -> host
2022-08-07 18:34:35.933 [ERROR] [HABApp.Config] -   extra fields not permitted (type=value_error.extra)
2022-08-07 18:34:35.933 [ERROR] [HABApp.Config] - openhab -> connection -> port
2022-08-07 18:34:35.934 [ERROR] [HABApp.Config] -   extra fields not permitted (type=value_error.extra)

The “i don’t tell” error message that cost me days …

The main headache that cost me countless hours was that if the files “HABApp.log” (in /var/log/openhab) and “HABApp_events.log” already exist then you get strange a strange error-message, that loggers could not be created …. and the error-message is not really helping — it’s just “something went wrong — have fun figuring out what” (note: please do not write such “I don’t tell” error messages (ever!)!):

Aug 14 11:01:29 openhabian habapp[14785]: Error loading logging config: Unable to configure handler 'EventFile'

Compare the outputs of ls -lah (I moved the old logfile instead of rm’ing it — so the old one is the second one):

-rw-rw-r-- 1 openhab    openhabian     4131 Aug 14 11:09 HABApp.log
-rw-r--r-- 1 openhabian openhab        2655 Aug  7 18:34 HABApp.log_BAK

The file-permissions are different … The thing is that it has nothing to do with the logging-config (I even deleted the config and let HabAPP create a default one when restarting) but still it crashed just because the old logfiles were still existing and it could not move them.

Success — finally

After deleting the old logfiles, HABApp was starting up successfully \o/ … furthermore, I simplified my window-rule (2 reminders are enough … it is quite annoying otherwise):

import HABApp
import HABApp.openhab.definitions
from HABApp.openhab.items import NumberItem

from HABApp.core.events import ValueUpdateEvent
from HABApp.core.events import ValueUpdateEventFilter
from HABApp.openhab.items import ContactItem
from HABApp.openhab.items import StringItem

from datetime import timedelta
import logging

log = logging.getLogger("MyRuleLogger")

class BathroomWindow(HABApp.Rule):
  messages = [
      "The window is open.",
      "Window open ... still ...",
  ]


  def __init__(self):
    super().__init__()

    self.run.soon(self.say("Starting..."))
    self.my_contact = ContactItem.get_item("Bathroom_Window")
    self.reminder = StringItem.get_item("Echo_Bathroom_Reminder")
    self.timer = None
    self.remind_count = 0
    self.run.soon(self.say("Got item..."))

    self.my_contact.listen_event(self.contact_updated, ValueUpdateEventFilter())

    self.run.soon(self.say("Setup completed."))

  def say(self, message):
    return lambda: print(message)

  def send_reminder(self):
    # only send some reminders -- do not flood the users 🙂
    if self.remind_count < len(self.messages):
      log.info("Increasing alarm-level and send notification.")
      self.reminder.oh_send_command(self.messages[self.remind_count])
      self.remind_count += 1
      log.info("Resetting timer.")
      self.timer.countdown(timedelta(minutes=15))
      self.timer.reset()
    else:
      log.info("Giving up -- setting timer to None.")
      self.timer.cancel()
      self.remind_count = 0
      self.timer = None

  def contact_updated(self, event: ValueUpdateEvent):
    log.debug(f'{event.name} updated value: "{event.value}"')
    log.debug(f"Last update of {self.my_contact.name}: " +
              f"{self.my_contact.last_update}")
    log.debug(f"Last change of {self.my_contact.name}: " +
              f"{self.my_contact.last_change}")

    if self.my_contact.is_open() and self.remind_count < len(self.messages):
      log.info("Triggering BathroomWindow rule.")
      if self.timer is None:
        log.info("Run countdown initially.")
        self.timer = self.run.countdown(
          timedelta(minutes=15),
          self.send_reminder
        )
        self.timer.reset()
    elif self.my_contact.is_closed() and self.timer is not None:
      log.info("Window was closed -- cancelling timer.")
      # a timer is set -- cancel it
      self.timer.cancel()
      self.remind_count = 0
      self.timer = None


BathroomWindow()

Window Alert Rule with HABApp and Alexa

TL;DR: I created a python-rule with HABApp that uses a window-sensor to send reminders to my Alexa-account.

I have installed a window open/close sensor in our bathroom — this very simple (XIAOMI Aquara) sensor speaks ZigBee and to talk to it I use the Conbee II (https://phoscon.de/en/conbee2) stick plugged into a raspberry pi which runs openhabian.

A picture of my window-sensor (yes, the alignment is a bit off… when the sticky tape needs to be replaced in a few years I will hopefully succeed in placing the sensor in a more upright position)

Adding the sensor to my openhab-instance was fairly easy but just manually checking its state through an openhab-sitemap is not really advanced. I wanted to have some rule triggered automatically when the window-state changes to “open” and since I find the standard-Java-DSL of openhab very cumbersome I wanted to write that rule in python (-> Rules with HABApp in Openhab 3).

Requirements

If the window is opened (state change closed->open), I want a countdown to be started (some 5-10 min depending on the current month — as an extension I could also query the local weather or an indoor temperature-sensor, or…). If the countdown expires I want to receive a reminder via Alexa that the window is open (this will trigger a speech-output on one of my echos and a notification on my smartphone via the Alexa app). Finally, the countdown should be reset. With every reminder (countdown expiration) I want the notification to get progressively more passive-aggressive, but after 4-5 reminders I want them to stop altogether (for example, if I am not at home I do not want to get flooded by notifications).

Prerequisites:

Things-file

The relevant portion of my things-file (of course I do not put Api-Keys etc. here so replace the “X”s below if you want to play along:

[...]
Bridge amazonechocontrol:account:MyEchoAccount "Amazon Account" @ "Accounts"
[discoverSmartHome=3,
 pollingIntervalSmartHomeAlexa=30,
 pollingIntervalSmartSkills=120]
{
  Thing echo echo_dot_bathroom "Alexa" @ "Bathroom" [serialNumber="XXXX"]
}

Bridge deconz:deconz:homeserver[host="X.X.X.X", httpPort="8090", apikey="X" ] 
{
  Thing openclosesensor bathroom_window "bath window" [id="6",
                                                       lastSeenPolling=2 ]
}
[...]

Items-file

We have to create a new item for the window-sensor and link it with the openclosesensor-thing defined above.

[...]

Contact Bathroom_Window "Bathroom Window [%s]" <door> {
        channel="deconz:openclosesensor:homeserver:bathroom_window:open" }

[...]

Group gAlexaBathroom "Alexa Bathroom" ["Bathroom"]

String Echo_Bathroom_Reminder "Reminder Bathroom" (gAlexaBathroom) {channel="amazonechocontrol:echo:MyEchoAccount:echo_dot_bathroom:remind"}

[...]

The rule

The rule writes a logfile (in /var/log/openhab/MyRules.log) which I have configured in the /etc/openhab/habapp/logging.yml

[...]
  MyRulesHandler:
    class: HABApp.core.lib.handler.MidnightRotatingFileHandler
    filename: '/var/log/openhab/MyRules.log'
    maxBytes: 1_048_576    
    backupCount: 3
    formatter: HABApp_format
    level: DEBUG
[...]
  MyRuleLogger:
    level: DEBUG
    handlers:
      - MyRulesHandler
    propagate: False

And finally the rule (placed into /etc/openhab/habapp/rules/bathroom_window.py):

import HABApp
import HABApp.openhab.definitions
from HABApp.openhab.items import NumberItem

from HABApp.core.events import ValueUpdateEvent, ValueChangeEvent
from HABApp.openhab.items import ContactItem
from HABApp.openhab.items import StringItem

from datetime import timedelta
import datetime
import logging

log = logging.getLogger("MyRuleLogger")

class BathroomWindow(HABApp.Rule):
  today = datetime.date.today()
  countdown_multiplier = 1
  if today.month > 4 and today.month < 7:
    countdown_multiplier = 2
  messages = [
      "The window is open.",
      "Window open -- still...",
      "Close the window already!",
      "Window ... !",
      "You lazy pig, close the window already!",
  ]

  def __init__(self):
    super().__init__()

    self.run.soon(self.say("Starting..."))
    self.my_contact = ContactItem.get_item("Bathroom_Window")
    self.reminder = StringItem.get_item("Echo_Bathroom_Reminder")
    self.timer = None
    self.remind_count = 0
    self.run.soon(self.say("Got item..."))

    self.my_contact.listen_event(self.contact_updated, ValueUpdateEvent)

    self.run.soon(self.say("Setup completed."))

  def say(self, message):
    return lambda: print(message)

  def send_reminder(self):
    # only send some reminders -- do not flood the users 🙂
    if self.remind_count < 5:
      log.info("Increasing alarm-level and send notification.")
      self.reminder.oh_send_command(self.messages[self.remind_count])
      self.remind_count += 1
      log.info("Resetting timer.")
      self.timer.countdown(timedelta(minutes=5 * self.countdown_multiplier))
      self.timer.reset()
    else:
      log.info("Giving up -- setting timer to None.")
      self.timer.cancel()
      self.remind_count = 0
      self.timer = None

  def contact_updated(self, event: ValueUpdateEvent):
    log.debug(f'{event.name} updated value: "{event.value}"')
    log.debug(f"Last update of {self.my_contact.name}: " +
              f"{self.my_contact.last_update}")
    log.debug(f"Last change of {self.my_contact.name}: " +
              f"{self.my_contact.last_change}")

    if self.my_contact.is_open() and self.remind_count < 5:
      log.info("Triggering BathroomWindow rule.")
      if self.timer is None:
        log.info("Run countdown initially.")
        self.timer = self.run.countdown(
          timedelta(minutes=5 * self.countdown_multiplier),
          self.send_reminder
        )
        self.timer.reset()
    elif self.my_contact.is_closed() and self.timer is not None:
      log.info("Window was closed -- cancelling timer.")
      # a timer is set -- cancel it
      self.timer.cancel()
      self.remind_count = 0
      self.timer = None


BathroomWindow()

(Remark: I auto-translated the messages (mine are in German — see below screenshot) with https://www.deepl.com which does a pretty decent job ^^)

Result

After opening the window, I get reminders every 10 minutes — both on the echo in the bathroom (which I do not hear when I am in a different room) and on my smartphone via the Alexa-App (see screenshot). After five reminders, the system gives up to not flood me (some further extensions could be that the delay between two reminders grows exponentially, or that only 3-4 reminders are sent etc. but you get the idea 🙂 ). Next, I want to install a temperature/humidity/air-quality sensor (a Bosch BME 680) in my bathroom, and then depending on the temperature/humidity I can adjust the time between reminders.

AoC’21 with Scala 3 in vscode

I want to learn and play with Scala 3 (currently I mostly use Scala 2.13) and to this end I decided to work through last year’s advent-of-code. You can find all my code so far on my github (MIT licensed): https://github.com/mschlund/aoc21

Setup

I chose vscode and the “metals”-extension to program in Scala (I am used to IntelliJ but vscode is much more lightweight).

Tips and Tricks

If the build-server does not start: maybe your build.sbt is erroneous — check the logs!

See https://docs.scala-lang.org/scala3/guides/migration/tutorial-sbt.html

I spent hours because the build.sbt had an error and finally including the following in the build.sbt fixed it for me (I wanted to use “better-files” in my code …):

("com.github.pathikrit" %% "better-files" % "3.9.1").cross(CrossVersion.for3Use2_13),

Lesson 9: Joystick and Displaying Directions

tl;dr: I describe a small blech-program (comprising of three modules) for combining an input via a joystick with the 8×8-matrix display.

You can find all code on Github as always (as a PlatformIO Project).

Prequel: Update .Net to 6.0 and build newest blech version

There have been some updates to the blech-compiler recently (read: in the last 2 weeks days), so we want to use this newest version (for instance there has been a bugfix concerning cobegin and when…abort — which is exactly what I am using)

First, we get the newest .Net 6.0:

Just follow the steps (for Linux)

https://docs.microsoft.com/dotnet/core/install/linux

Interestingly I had to remove my /etc/apt/sources.list.d/microsoft-prod.list before I could install the 21.04 list and locate “dotnet-sdk-6.0” just like suggested here:

https://github.com/dotnet/docs/issues/26879

Then be sure to use the new remote

git remote set-url origin https://github.com/blech-lang/blech
git checkout main
git pull
dotnet publish -c Release -r linux-x64

Finally, don’t forget to adapt your $PATH!

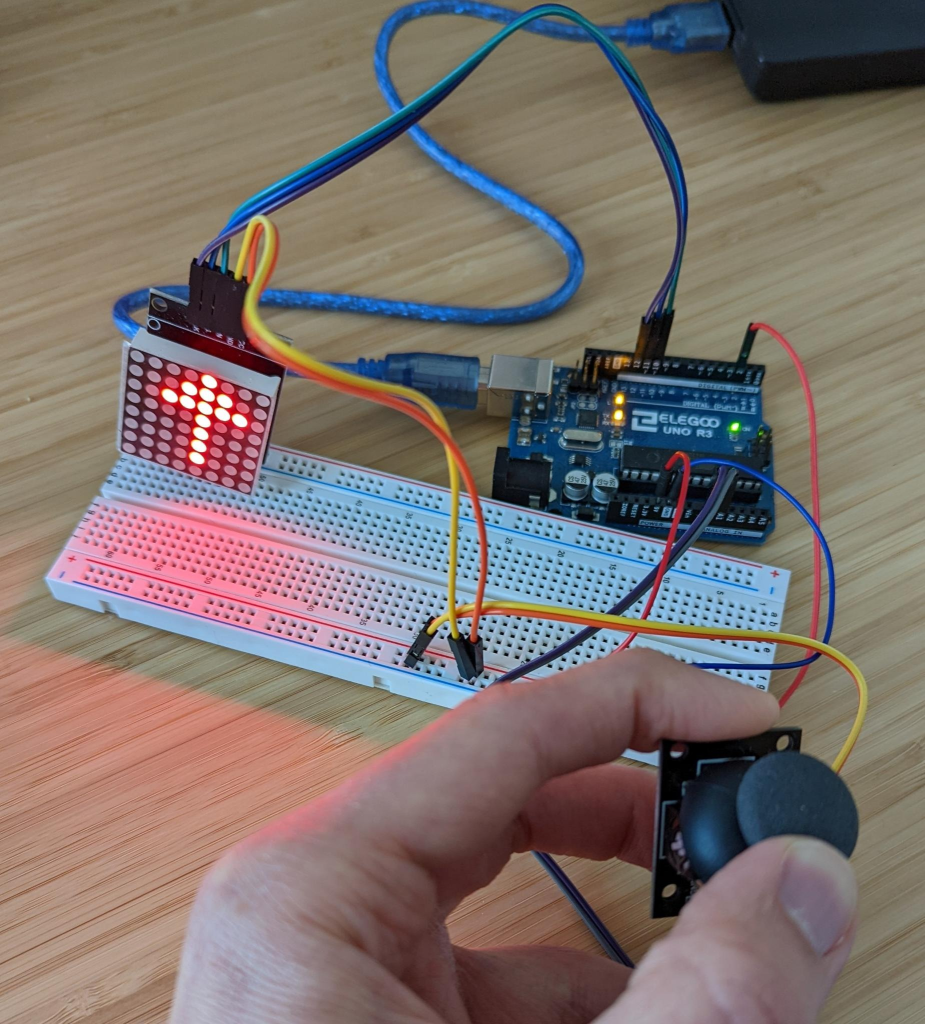
Joystick

Picture: The Joystick I am using.

The joystick has three output wires to transmit signals which can be read via Arduino’s analogRead (resp. digitalRead for the button-press which I do not use currently)

  • x-position (0–1023)
  • y-position (0-1023)
  • joystick pressed (0/1)

The central data structure is “direction” which currently is just one number.

// directios in the form NWSE
// currently saved as the first 4 bits NWSExxxx
struct direction
  var d: bits8
end

One might wonder why — why not just use “bits8” everywhere? In order to be able to change this in the future (e.g. it might be an enum once those are available) and in order not to have some other modules depend on the internals of this type, I chose to make it an opaque type, i.e. I deliberately do not export “direction” so no other modules can access its inner structure (-> https://en.wikipedia.org/wiki/Information_hiding).

function read_direction() returns direction
  let x = read_X()
  let y = read_Y()
  var dir : direction = {d=0}
  dir.d = 0

  if is_middle(x) and y > THRESHOLD_UPPER then
    // ^, North
    dir.d = dir.d | 1
  elseif x < THRESHOLD_LOWER and is_middle(y) then
    // <, West
    dir.d = dir.d | 2
  elseif is_middle(x) and y < THRESHOLD_LOWER then
    // v, South
    dir.d = dir.d | 4
  elseif x > THRESHOLD_UPPER and is_middle(y) then
    // >, East
    dir.d = dir.d | 8
  end

  return dir
end

The joystick returns a number 0–1023 for the position of the toggle (for each axis). We use two thresholds THRESHOLD_LOWER (512-300=212) and THRESHOLD_UPPER (512+300=812) to subdivide the area into a square of side-length 2*300=600 (see below)

In this fashion we can also encode diagonal directions seamlessly (all for the future…), e.g. the upper-left direction would be “1100” (the “North”- and “West”-bit are both 1). Currently, we have a function to only display the four directions N,W,S,E which takes a direction and returns an index (0-3 or -1) of the defined directions (see next section)

function dir_to_index(dir : direction) returns bits8
  var index : bits8 = -1
  if dir.d & 1 == 1 then
    index = 0
  elseif dir.d & 2 == 2 then
    index = 1
  elseif dir.d & 4 == 4 then
    index = 2
  elseif dir.d & 8 == 8 then
    index = 3
  end
  return index
end

Note that only four directions are displayed currently, if the directions are mixed (e.g. NW), we do not display anything!

Display

I slightly extend my MAX_72XX-module I developed last time.

I used my nice python-GUI-tool to “draw” arrows “->” in four directions and get their representation as eight 8-bit numbers (shameless self-promotion ^^).

module exposes [...], display_direction

param directions: [4][LEN]bits8 = {
    // NWSE:
    {0x10, 0x38, 0x7c, 0x10, 0x10, 0x10, 0x10, 0x0},   // ^
    {0x0, 0x20, 0x60, 0xfe, 0x60, 0x20, 0x0, 0x0},     // <
    {0x0, 0x10, 0x10, 0x10, 0x10, 0x7c, 0x38, 0x10},   // v
    {0x0, 0x4, 0x6, 0x7f, 0x6, 0x4, 0x0, 0x0},         // >
}

function display_direction (index : bits8) (d : Display)
  clear_display()(d)
  if index >= 0 and (index as nat8) < LEN then
    add_msg(directions[index], {x=0, y=0})(d)
  end
  draw_display(d)
end

Interaction

As a simple way to add interaction I want the program to do the following:

If the user moves the joystick into any of four directions (^<v>) the display should show an arrow in that direction. It should keep displaying the direction for some time — except if the user inputs another direction within this time (then the displaying should stop immediately and the different direction should be shown instead).

We implement this behaviour using two concurrent trails. In the one trail we display the current direction and then execute a delay which may be aborted if the variable “changed_dir” changes (which is written by the other trail). See the main-function for all the gory details:

import ajs "Analog_Joystick"
import display "MAX_72XX"
import ut "utils"

@[EntryPoint]
activity main ()
  var d = display.init()
  // might not be nontrivial initially
  var last_nontrivial_dir = ajs.read_direction()

  repeat
    var changed_dir = false
    var x = ajs.read_direction()
    cobegin
      await ajs.is_nontrivial(x)
      last_nontrivial_dir = x
      // dir to index may be 0
      // e.g. for a diagonal direction
      display.display_direction(ajs.dir_to_index(x))(d)
      // leave the displayed direction
      // on for some time
      await not changed_dir

      when changed_dir abort
        run ut.delay(500)
      end

    with weak
      repeat
        if ajs.is_nontrivial(x) then
          changed_dir = not ajs.equals(x, last_nontrivial_dir)
        end
        await true
        x = ajs.read_direction()
      end
    end
    display.erase_display()(d)
    changed_dir = false
    await true
  end

end

Bug? Misunderstanding?

The part

      when changed_dir abort
        run ut.delay(500)
      end

Should implement the “except”-part of the requirement above (the implementation of “delay” is dependent on #define MILLIS_PER_TICK in env.h)

However, depending on the value of the tick-duration defined in the environment this is not what happens (in the most extreme case “#define MILLIS_PER_TICK 1” the displaying takes some ~12s, while for “#define MILLIS_PER_TICK 5” we get some ~3s) — this phenomenon is interesting and I am working on extracting a minimal example showcasing the issue.

UPDATE: this is not really surprising … I am using the Arduino “delay”-function (which just waits for some time) to drive the system-tick… I should use something that takes into account the runtime of the tick-function (so if this takes ~1ms and the tick is 5ms then we should wait ~4ms … using something like millis() for example is the first step in the right direction maybe ^^ -> NEXT)

Result

This mini-project is just a stepping-stone for some more interesting “game” I want to develop (stay tuned…) but has reached sufficient complexity that I want to write about it now :).

Rules with HABApp in Openhab 3

To automate my smart home I move from standard-openhab-rules (which are written in a Java-DSL) to HABApp (which is python … and python >> Java … imho)

The hilarious comic on https://www.monkeyuser.com perfectly describes my experiences 🙂

Important: This is python — code is interpreted and hence errors are not checked statically but happen dynamically! Make sure to always check the end of the logfile (/var/log/openhab/HABApp.log) for errors. It might happen that your fancy rule is not loaded (or dies in the middle of execution) because of a syntax-error or similar — consult the log and do not waste countless hours (like me…) wondering why your items are not loaded!

Install and setup

  1. I installed HABApp via “sudo openhabian-config” and then selecting 20 and 2B
  2. Go to /opt/habapp (this is a python venv)
  3. source bin/activate (now the “habapp” venv should be active and changed your shell-prompt)
  4. I had to install the required dependencies manually, so copy https://github.com/spacemanspiff2007/HABApp/blob/master/requirements_setup.txt and do a “pip install -r requirements_setup.txt”

Create an API-token via the openhab-GUI (https://community.openhab.org/t/habapp-easy-automation-with-openhab/59669/234)

The relevant part of the config-file (in /etc/openhab/habapp/config.yml):

[...
openhab:
  connection:
    host: @HOSTNAME/IP_OF_YOUR_INSTANCE
    port: 8080
    user: '$YOUR_API_TOKEN'
    password: ''
[...]

My mistake

Another warning: Especially in the openhab-community there are a lot of people just blindly copying code they read somewhere without understanding everything — do not do this… especially not from here!

import HABApp
class MyFirstRule(HABApp.Rule):
    def __init__(self):
        super().__init__()
        self.run.soon(self.greeting)

    def greeting(self):
        print("Hello, World!")

MyFirstRule()
openhabian@openhabian:/etc/openhab $ /opt/habapp/bin/habapp --config /etc/openhab/habapp
    __  _____    ____  ___
   / / / /   |  / __ )/   |  ____  ____
  / /_/ / /| | / __  / /| | / __ \/ __ \
 / __  / ___ |/ /_/ / ___ |/ /_/ / /_/ /
/_/ /_/_/  |_/_____/_/  |_/ .___/ .___/
                         /_/   /_/
                                     0.31.2
Hello, World!

After this successful hello-world, I went on to address my openhab-items with the rule and also thought along the way “well let’s make the printing a bit more general” and ended up writing:

import HABApp
class MyFirstRule(HABApp.Rule):
    def __init__(self):
        super().__init__()
        self.run.soon(self.say('Hello!'))
        [...a lot of code for getting an item ...]
        self.run.soon(self.say('Goodbye!'))

    def say(self, message):
        print(message)

MyFirstRule()

What happens?

openhabian@openhabian:/etc/openhab $ /opt/habapp/bin/habapp --config /etc/openhab/habapp
    __  _____    ____  ___
   / / / /   |  / __ )/   |  ____  ____
  / /_/ / /| | / __  / /| | / __ \/ __ \
 / __  / ___ |/ /_/ / ___ |/ /_/ / /_/ /
/_/ /_/_/  |_/_____/_/  |_/ .___/ .___/
                         /_/   /_/
                                     0.31.2
Hello!

Ok… just the first part is printed … I furiously searched for my error in the (not shown…) part where I try to get an item from my openhab etc….. turns out the error is not inside this part but in the printing!

Look at the log, Luke ….

[...]
2022-03-06 10:55:55.051 [DEBUG] [HABApp.Rules                        ] - Loading file: rules/basic_hello.py
2022-03-06 10:55:55.525 [ERROR] [HABApp.Rules                        ] - Error "'NoneType' object has no attribute '__name__'" in load:
2022-03-06 10:55:55.525 [ERROR] [HABApp.Rules                        ] - Could not load /etc/openhab/habapp/rules/basic_hello.py!
2022-03-06 10:55:55.526 [ERROR] [HABApp.Rules                        ] - File "/opt/habapp/lib/python3.7/site-packages/HABApp/rule_manager/rule_file.py", line 80, in load
2022-03-06 10:55:55.526 [ERROR] [HABApp.Rules                        ] -     self.create_rules(created_rules)
2022-03-06 10:55:55.526 [ERROR] [HABApp.Rules                        ] - File "/opt/habapp/lib/python3.7/site-packages/HABApp/rule_manager/rule_file.py", line 69, in create_rules
2022-03-06 10:55:55.527 [ERROR] [HABApp.Rules                        ] -     '__HABAPP__RULES': created_rules,
2022-03-06 10:55:55.527 [ERROR] [HABApp.Rules                        ] - File "/usr/lib/python3.7/runpy.py", line 263, in run_path
2022-03-06 10:55:55.527 [ERROR] [HABApp.Rules                        ] -     pkg_name=pkg_name, script_name=fname)
2022-03-06 10:55:55.528 [ERROR] [HABApp.Rules                        ] - File "/usr/lib/python3.7/runpy.py", line 96, in _run_module_code
2022-03-06 10:55:55.528 [ERROR] [HABApp.Rules                        ] -     mod_name, mod_spec, pkg_name, script_name)
2022-03-06 10:55:55.528 [ERROR] [HABApp.Rules                        ] - File "/usr/lib/python3.7/runpy.py", line 85, in _run_code
2022-03-06 10:55:55.529 [ERROR] [HABApp.Rules                        ] -     exec(code, run_globals)
2022-03-06 10:55:55.529 [ERROR] [HABApp.Rules                        ] - File "/etc/openhab/habapp/rules/basic_hello.py", line 11, in basic_hello.py
2022-03-06 10:55:55.529 [ERROR] [HABApp.Rules                        ] -     7    
2022-03-06 10:55:55.530 [ERROR] [HABApp.Rules                        ] -     8        def say(self, message):
2022-03-06 10:55:55.530 [ERROR] [HABApp.Rules                        ] -     9            print(message)
2022-03-06 10:55:55.530 [ERROR] [HABApp.Rules                        ] -     10   
2022-03-06 10:55:55.531 [ERROR] [HABApp.Rules                        ] - --> 11   MyFirstRule()
[...]

This (very confusing… sigh) first message “Error “‘NoneType’ object has no attribute ‘__name__'” in load:” basically means that the rule could not be loaded and hence is “None”. So this means that the program executes the “say”-function (i.e. does a “print”) and then it dies.

But … why? Ok, long story short “self.run.soon” takes as parameter a callback, i.e. a function, not a value…

Primitive fix:

import HABApp
class MyFirstRule(HABApp.Rule):
    def __init__(self):
        super().__init__()
        self.run.soon(self.say('Hello!'))
        self.run.soon(self.say('Goodbye!'))

    def say(self, message):
      return lambda : print(message)

MyFirstRule()

Let’s try it….

openhabian@openhabian:/etc/openhab $ /opt/habapp/bin/habapp --config /etc/openhab/habapp
    __  _____    ____  ___
   / / / /   |  / __ )/   |  ____  ____
  / /_/ / /| | / __  / /| | / __ \/ __ \
 / __  / ___ |/ /_/ / ___ |/ /_/ / /_/ /
/_/ /_/_/  |_/_____/_/  |_/ .___/ .___/
                         /_/   /_/
                                     0.31.2
Hello!
Goodbye!

Works … sigh… static typing could have prevented this — this is the drawback of python.

Moral of the story: Always develop in small increments (in my case: a small refactoring of the “say”-function before adding a lot of code for handling items) even if they seem trivial to you — so you do not end up hunting ghosts 🙂

Switching to PlatformIO

tl;dr: Moving from the Arduino-extension in vscode to PlatformIO (extension for vscode as well)

From my newest project on (https://github.com/mschlund/blechexamples_arduino/tree/main/Analog_Joystick work in progress), I will use PIO in vscode for Arduino/ESP-development. It is way more professional (and also easier to use with nested folder structures etc.) but still easy to set up, clone repositories etc. I had played with it already some months ago but recently came across it again when hacking an Ikea-particle-sensor for fun (still have to document my experiences here…), see

https://www.heise.de/ratgeber/Ikea-Feinstaubsensor-Vindriktning-zum-IoT-Device-aufbohren-6164149.html (in German)

The software used is on github by the user Hypfer and is a PIO-project for the ESP8622 https://github.com/Hypfer/esp8266-vindriktning-particle-sensor — it works great, out-of-the-box, and is quite well written I think!

If you want to use PIO, watch the great video tutorial for Beginners with PlatformIO first: https://www.youtube.com/watch?v=JmvMvIphMnY